A solid notion project management template isn't just a to-do list; it's a flexible, living framework you build to organize your projects, tasks, and teams. Imagine you're building a house. Instead of buying a pre-fabricated home that doesn't quite fit your needs, Notion gives you the blueprints and the tools to build a custom home that's perfect for you. This is what it feels like to create a system that actually matches your unique workflow.
Why Generic PM Tools Just Don't Work for Your Team
Let's be honest: most project management tools feel like they were built for someone else. They force you into strict structures and pre-set workflows that almost always clash with how your team actually gets things done. It’s like trying to fit a square peg in a round hole. You end up spending half your time creating clunky workarounds just to fit your process into their rigid boxes.
This one-size-fits-all approach isn't just frustrating—it actively kills creativity and slows your team down. When a tool dictates your process, you spend more time managing the software than actually managing the project.
The Problem with Pre-Built Systems
The real issue with most off-the-shelf tools is their complete lack of flexibility. They operate on the false assumption that every team works the same way, which is just never true. A marketing team's creative sprint has entirely different needs than an engineering team's bug-squashing cycle.
These rigid systems almost always lead to the same problems:
- Wasted Time: Teams burn valuable hours trying to hack the tool to fit their process, pulling focus away from the actual work.
- Poor Adoption: If a tool feels unnatural or is a pain to use, people just won't use it. This leads to scattered information and project chaos.
- Information Silos: Many tools don't play nicely with other essential apps, forcing you to constantly jump between platforms to get a complete view of what's going on.
The best project management system is one that adapts to you, not the other way around. It should feel like a natural extension of your team's brain, not a barrier to getting things done.
Embracing a Flexible Framework
This is where Notion’s block-based system really shines. It gives you the power to build a project management hub that perfectly mirrors how your team operates. Before you dive in, it’s helpful to get clear on your goals by understanding the fundamental differences between Project Management vs Product Management.
Instead of being stuck with preset categories, you create the properties, views, and dashboards you actually need. It’s all about building a living system that evolves right alongside your projects. You can pull everything from initial brainstorms to final deliverable trackers into one connected space.
The popularity of Notion for project management has exploded for this very reason, growing to over 20 million users worldwide as of 2023. Its adaptable nature allows teams to build their own solutions from the ground up.
Check out the key differences in flexibility, customization, and integration between a standard project management tool and your own bespoke Notion setup.
Standard PM Software vs A Custom Notion System
Ultimately, a custom Notion system puts you in the driver's seat.
Putting in the time to create or customize a Notion project management template pays off massively in clarity and team alignment. If your team leans toward agile methodologies, it's also worth checking out the best agile project management tools to see how these adaptable systems stack up. Building a system that reflects your reality is the secret to unlocking true efficiency.
Laying the Foundation with Master Databases
The secret sauce to a powerful Notion project management template isn't flashy dashboards; it's the solid structure humming away underneath. Instead of having information scattered across dozens of random pages, we're going to build the system's brain: two master databases that will become the single source of truth for everything your team does.
Think of it this way: your entire system rests on just two central pillars. One for your Projects, and one for your Tasks. By keeping them separate but linking them together, you create a flexible setup. You can zoom out to see the big picture of all active projects, or zoom right in to a specific task assigned to one person—all without losing your place. This is what elevates a simple to-do list into a real project management powerhouse.
The initial setup is pretty straightforward, and this flow chart gives you a good visual map of the process.
As you can see, we're basically building a core structure to define the work and make sure every piece of it has a clear owner.
Creating the Projects Database
First up, let's build the Projects database. This is your 30,000-foot view where every entry is a major initiative. Here's a quick step-by-step:
- Create a new, full-page database in Notion.
- Give it a simple name, like "Projects."
Now, we need to add a few key properties to give each project context. These are the non-negotiables I use in almost every build:
- Status: This is a 'Select' property. It’s perfect for tracking where a project is in its lifecycle. Start with simple options like
Planning,In Progress,On Hold, andCompleted. You can always change these later. - Owner: Use a 'Person' property here. This assigns a clear project lead, which is crucial for accountability. No more wondering who to ask for updates.
- Timeline: A 'Date' property with the "end date" toggle turned on is a must. This sets your deadlines and will be essential for building out visual roadmaps later.
- Project Type: I like using a 'Select' or 'Multi-Select' for this. It’s fantastic for categorizing your work, like
Marketing Campaign,Software Feature, orInternal Process.
These properties are more than just labels; they're powerful sorting tools. Down the road, they’ll let you create custom views, like a board showing only "In Progress" marketing campaigns.
A quick tip from experience: don't go overboard adding every property you can imagine right now. Start with the basics. A clean, simple database is way more effective than a cluttered one. You can always add more fields later as you figure out what you truly need.
Building the Tasks Database
With our projects hub in place, it's time for the Tasks database. This is where the day-to-day work actually happens. Every project is just a collection of smaller actions, and this database is where we'll track them all.
- Create another full-page database.
- Call it "Tasks."
Here are the essential properties to get you started:
- Status: Just like with projects, a 'Select' property works perfectly. My go-to options are simple:
To Do,In Progress, andDone. - Assignee: Another 'Person' property to assign the task to a specific team member.
- Due Date: A 'Date' property is critical for setting clear deadlines for each task.
- Priority: I use a 'Select' property here with
High,Medium, andLow. This is a lifesaver for helping the team focus on what's most important each day. - Task Category: A 'Multi-Select' property can be handy for grouping similar work, such as
Design,Copywriting, orDevelopment.
If you're still getting the hang of Notion databases and properties, you can learn more about how to create a Notion template from the ground up. It’s worth brushing up on the fundamentals before diving deeper.
The Magic of the Relation Property
Okay, this next part is where the real magic happens. We’re going to link these two databases together, transforming them from two separate lists into one interconnected system.
Here's how to do it:
- Go to your Tasks database and click to add a new property.
- For the property type, choose 'Relation'.
- Notion will ask you which database you want to connect to—select your Projects database.
- A prompt will then ask if you want to show this relation on the Projects database, too. Definitely toggle this on and name the corresponding property "Tasks."
This simple connection is a total game-changer.
Now, whenever you create a new task, you can directly link it to its parent project. Even better, when you open any entry in your Projects database, you'll see a neat, automatically updated list of every single task associated with it. This two-way sync keeps everything organized without any extra effort. You’ve just built the foundation for a truly dynamic project management system in Notion.
Designing Your Action-Oriented Dashboard
Your master databases are the engine, but what good is an engine without a dashboard to steer it? A database by itself is just raw data; a dashboard is where you actually get the work done. Now that our foundation is solid, it's time to build the visual interfaces that make your system genuinely useful and intuitive for the whole team.
The idea is to create a central command center. This isn't about making things pretty—it's about creating focused views that show each person exactly what they need to see, without the overwhelming noise of a massive table. We'll kick things off by creating a main 'Project Hub' page where everything will live.
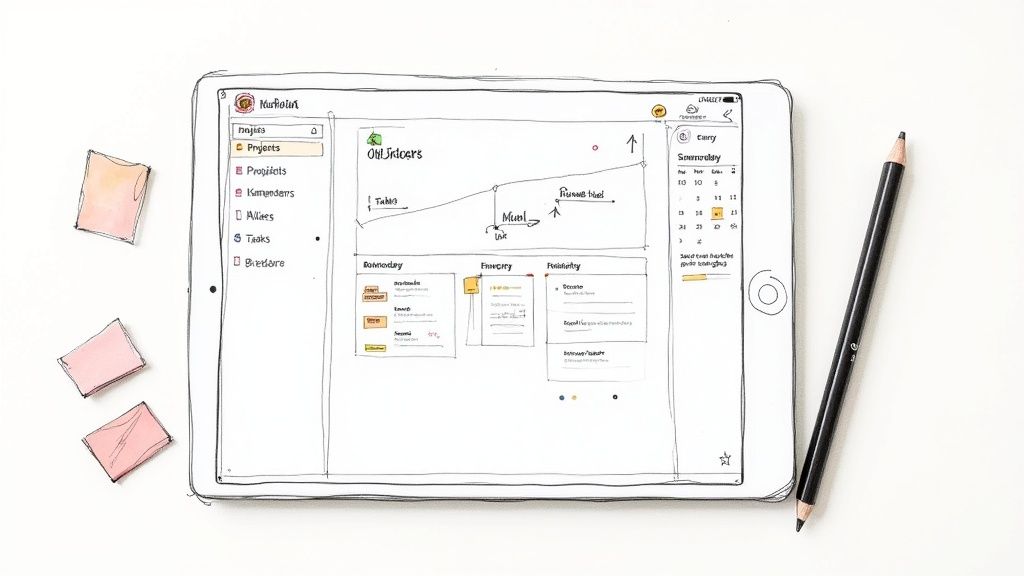
This screenshot of a dashboard shows just how organized and visually diverse a good hub can be, pulling different types of content into one cohesive space.
Notice how it blends lists, calendars, and text blocks to build a central hub. That's exactly the kind of focused environment we're aiming for.
Building Your Project Hub
First things first, create a new, empty page in Notion and give it a clear name like "Project Hub" or "Team Command Center." Think of this page as the canvas for our entire dashboard. We won't be adding much content directly to it; its main job is to hold the different database views we're about to create.
The real magic of a Notion dashboard comes from linked views of a database. This feature is a game-changer. It lets you display your master databases in multiple places and formats, all while staying perfectly in sync. Any update you make in one view is instantly reflected back in the master database and every other linked view.
Creating Essential Dashboard Views
With our blank Project Hub page ready, let's bring that data to life. We'll use the /linked view of database command to embed different perspectives of our 'Tasks' and 'Projects' databases right onto the page.
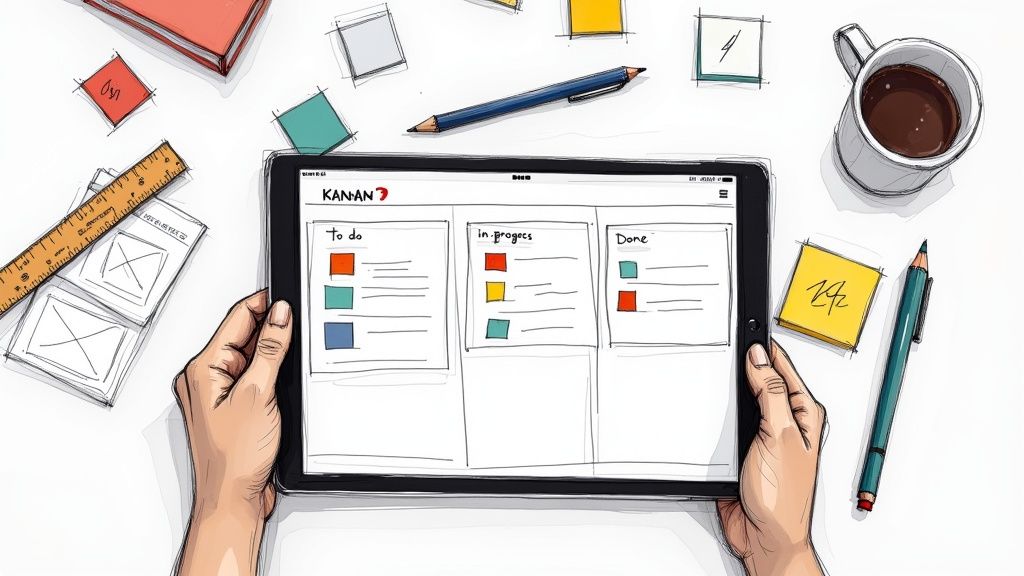
A Kanban board is a fantastic way to get a visual pulse on all ongoing work. Here’s a simple guide to set one up:
- On your Project Hub page, type
/linked viewand select your 'Tasks' database. - It will probably show up as a table by default. No problem—just click on the layout options and switch it to a 'Board' view.
- Next, group this board by the 'Status' property. Instantly, you'll see columns for 'To Do', 'In Progress', and 'Done'.
Now your team can just drag and drop tasks between columns, giving everyone a real-time, satisfying visual of progress.
Here are a few other essential views I recommend building:
- Project Timeline: Add another linked view, but this time, choose your 'Projects' database. Change the layout to 'Timeline'. This creates a Gantt-style chart, giving you a high-level overview of all project schedules and helping you spot potential overlaps.
- Team Task Calendar: Create a linked view of the 'Tasks' database and set the layout to 'Calendar'. This view is perfect for tracking deadlines and planning weekly workloads visually.
- Master Project List: Sometimes you just need a straightforward list. Add a final linked view of the 'Projects' database and keep it as a 'Table' layout. This becomes your go-to for a quick, sortable overview of every single project.
Customizing Views with Filters
A great dashboard isn't just comprehensive; it's personal. Generic views are a good start, but custom-filtered views are what make a Notion project management template truly indispensable. Filters let you slice and dice your master databases to show only the most relevant information for a specific person or context.
The most effective dashboards reduce cognitive load. By creating personalized, filtered views, you eliminate the mental energy your team would otherwise spend searching for what they need to work on next.
Let's build a couple of hyper-focused views that every team member will love.
My Open Tasks View
Start by duplicating your Kanban board view of the 'Tasks' database. Rename this new view to something like "My Open Tasks." Now, let's add two simple filters:
- Assignee
isMe(This is dynamic and automatically shows each logged-in user their own tasks). - Status
is notDone.
Just like that, you've created a personal to-do list for every single person on the team. They can now land on the Project Hub and immediately see exactly what's on their plate, no distractions. For more advanced strategies, check out our deep dive on revolutionizing task management in Notion.
High Priority This Week View
Here's another powerful view. Duplicate the 'Tasks' calendar and rename it "This Week's Priorities." Then, add these filters:
- Priority
isHigh. - Due Date
is on or beforeone week from now.
This view instantly surfaces the most critical, time-sensitive tasks, helping the team focus their energy where it truly matters. By combining different layouts with smart filters, you transform your static data into an action-oriented command center that actively guides your team toward its goals.
Supercharging Your Template for Smarter Workflows
Okay, you've got a solid dashboard set up, and your Notion project management template is already doing some heavy lifting. But we can take it a step further. Let's turn it from a simple task tracker into a strategic machine that understands not just project timelines, but human energy, too.
We're going to do that by weaving in two powerful frameworks: Agile sprints and energy-based planning.
This isn't about micromanagement. It's about shifting your workspace from a reactive to-do list into a proactive system for planning. The goal is to help your team focus their efforts in short, productive bursts while also accepting the reality that not all work hours are created equal. It’s all about working smarter, not just harder.
Adapting for Agile Sprints
Agile workflows are all about sprints—short, time-boxed periods where a team commits to completing a specific chunk of work. To get this running in our template, we just need to make a couple of tweaks to our databases.
First, let's head back to your Tasks database. We're going to add two new properties:
- Story Points: This will be a 'Number' property. It’s a way to estimate the effort a task requires, not the time. Common scales include the Fibonacci sequence (1, 2, 3, 5, 8) or a simple t-shirt sizing model (1, 2, 4, 8).
- Sprint: This is the key. Make this a 'Relation' property that will link our tasks to specific work cycles.
Next up, create a new full-page database and name it Sprints. This is where each of your sprint cycles will live. You'll want to add a few essential properties here:
- Timeline: A 'Date' property with an end date enabled. This defines the start and finish of your sprint (for example, a two-week period).
- Status: A 'Select' property is perfect here. Give it options like
Planning,Active, andCompleted. - Goal: A simple 'Text' property is all you need to state the main objective for that sprint.
With both databases ready, it's time to connect them. Go into your Tasks database and configure that 'Sprint' property to relate to your new Sprints database. This creates a two-way link, which is incredibly useful. You can now assign any task to a specific sprint, and from the Sprints database, you can see every single task associated with it.
Building Your Sprint Dashboard
Now that the databases are talking to each other, you can build a dedicated space for sprint planning. Back on your main Project Hub page, create a new section for your sprints. I like to embed a linked view of the Sprints database here, maybe as a simple table or list.
The real magic, though, is creating a Kanban board view of your Tasks database. Filter this board to only show tasks where the Sprint property is set to your Active Sprint. This gives the team a super-focused workspace where they can see exactly what they've committed to for the current cycle.
If you want to go even deeper on this, check out this detailed guide on mastering sprint planning with the power of Notion.
Planning with Human Energy in Mind
Productivity isn't just about managing time; it's about managing energy. Some tasks demand deep, creative focus, while others are better suited for when your brainpower is running a little lower. Acknowledging this can make a massive difference in reducing burnout and actually increasing output.
To build this into your system, go back to the Tasks database one last time and add a simple property:
- Energy Level: Use a 'Select' property with three options:
High Energy(for creative or difficult tasks),Medium Energy(for routine work), andLow Energy(for simple admin or cleanup).
This small addition is surprisingly powerful. It nudges your team to think about when they should tackle their work, not just what they have to do.
I once had my team start tagging their tasks this way. We quickly discovered that scheduling our
High Energycreative work for the morning and pushingLow Energyadmin tasks to the afternoon made a huge difference. Our output on key projects went up, and people reported feeling less drained by the end of the day.
You can take this a step further by creating filtered views on your dashboard. For instance, a "Deep Work Focus" list that only shows High Energy tasks. This simple shift in perspective helps align your team's natural energy cycles with their workload, making the whole system feel more human-centric and, ultimately, more effective.
Automations & Advanced Features
Alright, you've got the foundation of your project management system built and a killer dashboard to keep things in view. Now, let's get into the really cool stuff—the finishing touches that take your template from a simple organizer to a smart, self-managing powerhouse. We're going to dive into some of Notion's more advanced features to cut out the manual busywork for good.
The whole point is to make your notion project management template work for you, not the other way around. Once you automate the repetitive stuff, you free up more brainpower for the work that actually matters.
Pre-Populating Work with Database Templates
Think about every new project you kick off. You probably have a standard set of tasks, a go-to checklist for deliverables, or a specific outline for your project brief. Building these from scratch every single time is a sneaky time-waster. That’s exactly what database templates are for.
Inside any database, you can create pre-built page templates. Let's say in your 'Projects' database, you create a template called "New Marketing Campaign."
- Inside, you can pre-load a project brief outline using H2 headings for Goals, Target Audience, and Key Metrics.
- You could also drop in a linked view of your 'Tasks' database, already filtered to show only tasks related to that specific project.
- Better yet, add a standard checklist of kickoff tasks, like "Schedule kickoff meeting" or "Define project scope."
Now, when you click "New" and pick the "New Marketing Campaign" template, the entire structure is there in an instant. This little trick keeps everything consistent and saves you a ton of clicks.
Calculating Progress with Rollups and Formulas
This is where your system starts to feel genuinely intelligent. Rollups and Formulas are two powerful property types that run calculations based on data in your other databases. Let's build a classic example: a project progress bar.
First, your system needs to know what a "completed" task looks like. In your 'Tasks' database, add a 'Checkbox' property and name it "Done." Next, we'll use a Formula to turn that checkmark into a number. Add a 'Formula' property called "Task Complete" and plug this in: if(prop("Done"), 1, 0). All this does is spit out a 1 if the box is checked and a 0 if it's not.
This is the secret sauce: turning a simple action (checking a box) into a number that Notion can actually work with. It's a small step that unlocks some seriously powerful automations.
Okay, head back to your 'Projects' database. We're going to add two 'Rollup' properties:
- Total Tasks: This rollup will connect to your 'Tasks' relation, look at the 'Task Complete' property, and use the
Count allcalculation. - Completed Tasks: This one uses the same 'Tasks' relation and 'Task Complete' property but selects
Sumfor the calculation instead.
Just one more step. Add another 'Formula' property to your 'Projects' database and name it "Progress." The formula is simple: prop("Completed Tasks") / prop("Total Tasks"). Change the number format to 'Percent' and select the 'Bar' display option. And there you have it! A fully automated progress bar that updates in real-time as your team checks off tasks.
Integrating Competitive Analysis
A truly solid project template doesn't just track your internal work—it helps shape your strategy. Building a dedicated section for competitive analysis right into your project template can give you a strategic advantage right from the start.
For any project manager, having competitive analysis templates handy is key to understanding the market and spotting opportunities. These frameworks usually help you profile competitors, compare features, and check for market threats, which helps you make smarter moves before the project even gets off the ground.
And if you want to push your Notion setup even further, it’s worth digging into mastering Notion AI, which can really supercharge your workflows and add another layer of intelligence to your projects.
Got Questions About Notion PM Templates?
As you start getting comfortable with your new Notion setup, you're bound to have a few questions. It’s totally normal. Think of this as your quick-start guide for tackling those early hurdles and really making this notion project management template your own.
Let’s get into some of the most common things people ask when they make the switch.
Can I Use This for Both Solo and Team Projects?
Yes, absolutely. The secret sauce here is the database structure—it’s built to scale.
If you’re a freelancer or solopreneur, it's perfect for keeping your personal and client work organized without any clutter. You can set up views that show only your tasks, blocking out all the noise you might find in team-focused tools.
And when you bring on a team? The template grows right along with you. Just add new properties like 'Department' or 'Team Lead' to your databases. From there, you can spin up filtered dashboards for each group. The marketing team sees their world, engineering sees theirs, but it all pulls from the same master databases. One source of truth, but with personalized views for everyone.
What's the Best Way to Handle Recurring Tasks?
This is a classic PM headache, but Notion has a pretty slick, built-in solution for it now.
When you add a due date to any task, you'll spot an option to make it repeat. You can set it up to create a new task for you daily, weekly, monthly, or on whatever custom schedule you need. It’s a lifesaver for routine work like weekly reports or daily stand-ups, automatically popping up when it's supposed to.
If you need something a bit more complex, you can always connect Notion to automation tools. Services like Zapier or Make.com can build some seriously powerful workflows, like automatically generating a whole checklist of tasks the moment a new project kicks off.
Is It Possible to Track Time and Budgets?
Definitely. That's the beauty of a flexible Notion system—you can track pretty much any data point you can think of. To fold in time and money, you just need to add a few new properties.
Here’s a simple way to do it:
- For Time Tracking: In your 'Tasks' database, add two Number properties. Call them 'Estimated Hours' and 'Actual Hours'.
- For Budgeting: In your 'Projects' database, add two Currency properties. Name them 'Budget' and 'Actual Spend'.
Once you have those, you can get fancy with Formula properties to see the variance between your plan and reality. Even better, use a Rollup in your 'Projects' database to automatically total up all the 'Actual Hours' from every linked task. You'll get a live, running total of time spent on the entire project without lifting a finger.
How Do I Get My Team Onboard with This?
Getting your team to actually use a new system is half the battle. The trick is to make the switch as painless as possible and show them the "why" behind it all. Don't just hand it over and walk away—guide them.
Start with a quick training session. Keep it short and to the point. I also highly recommend building a simple 'How to Use This' guide right inside the template's main page. You can even embed short screen recordings (Loom is great for this) or GIFs to walk through the key dashboards.
The most important part? Frame it around their frustrations. Show them exactly how this new setup solves the specific problems they had with the old way of doing things. When they see it makes their day easier, you’ll get genuine buy-in, not just forced compliance.
Ready to stop fighting with clunky software and build a system that actually works the way you do? The Nora Template is a complete, plug-and-play Notion project management system that has all these best practices built right in. It’s designed to get you and your team organized from day one.
.svg)